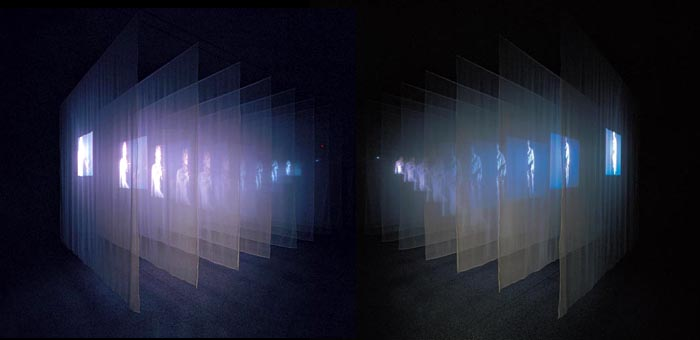
Projection on Static Transparent Material

Projecting on semi-transparent materials is essentially a variation on the Pepper’s ghost illusion. It is also an effect that has been used in theater for a long time. In contrast to Pepper’s ghost, this technique uses a transparent material to catch (not just reflect) the light from a projector. The viewer can still see through the material, but the projected light is scattered and appears to be transmitted from the material. Viewers can still see through the material allowing for a depth effect from parallax, but the illusion is still flat and two dimensional.
The implementation of this technique is one of the cheapest and most accessible on this list. You will need a semi transparent material and some means of projecting an image. The material you use depends on the scale or size of the end result and the type of effect you are going for. You also must consider whether you want to use front or rear projection. Rear projection (with the viewer facing the projector lens) will produce a noticeably brighter hotspot depending on the material used and where the projector is, and front projection means the image will spill behind the surface a little bit which may result in some doubling.
As far as materials to use, on a small installation you may be able to get away with just a piece of fabric like tulle or netting — things like bridal veil material. White fabric will catch and transmit light the best, but sometimes black can still work and give you a similar effect with the fabric appearing more “invisible.”
If you are trying to have an image appear on a storefront window or piece of glass, you will need a specially engineered film that is nice and transparent but still collects a lot of light from your projector. The proper film for glass can be very expensive for large pieces, so keep that in mind. One source has it at almost $1200 for a piece that is 2.2m by 1.2m. Here are some possible vendors for this kind of film: [One] [Two]. You can get away with cheaper materials, of course, but the effect may be very different. Cheaper or DIY material may be either more opaque (yielding a brighter image but less transparency) or too transparent (yielding a faint image). Projecting on glass will certainly show something if there is significant dust on it, but the effect will be very dim.

To achieve much larger images for theater or stage, fabric is the most economical choice for a scrim. You can get very large seamless swaths of fabric for the purposes of stage projection. Some fabric will have larger holes in its netting which will make it more transparent but will also cause your projected image to be less bright as well, in addition to dropping the sharpness and fidelity of the image. Here is a great resource for more info on stage scrim projection materials, including silvered fabric. You can also layer these materials to get several planes since the light is passing through. The cone of light from the projector will cause the image to be larger or smaller on each depth layer depending on whether you are projecting from the front or the back. You can also only go so far with layering before your light runs out or just gets out of focus.
Similar to the requirements for Pepper’s Ghost, this technique requires very controlled lighting. You will need to balance the ambient light that is hitting your fabric so you can preserve the illusion of a floating image — otherwise it can just look like a standard projection screen that you can see through. Contrast is keyhere. It also helps to have the space behind the image not be completely dark to give the image more dimension. If the viewer can see behind the image then they get the layered effect and the sense of parallax that helps it appear more 3D even if it is still just 2D.
Content that works best on any of the semi-transparent materials tends to be imagery that does not fill the entire projected rectangle. The optimal approach is to have your content sit on a field of black, so that that it appears to have no bounds. A vignette or feathering on the edges can also help if you have elements that enter and exit from the sides, otherwise the viewer will see harsh edges. Semi transparent material also causes the projections to have a slight glow to them — the light beams get slightly diffused when passing through the material which tends to soften the sharpness of the image a little bit.
This technique below uses thousands of hanging bits of material to create a sort of volumetric form that is hit with multiple projectors:
See also:
Carbon Black projection material, sometimes also called Carbonmesh Holo: https://www.carbonblack.technology
Hologauze: https://www.holotronica.com/hologauze/
Kaleida Holonet: https://www.wearekaleida.com/holonet
Last updated